e‑Sword



Getting Started
User Preferences
You may want to adjust the display settings, such as background color and font size. To do this, select the "Options" menu on the app's top menu bar, then choose "Display Settings" or "Font Settings" as needed.
Downloading Modules
You will want to download some resources to study with. To do this, select the "Download" menu on the app's top menu bar, then choose a resource type — for example, "Bibles" — to see a listing of everything available for download. Select the item you wish to download to begin the process. Repeat as needed for each resource type you would like to add.
Modules listed under the "Premium" sub-section are locked and must be purchased directly from their publisher. The publisher will then provide a product key for installation. Modules previously purchased for use with any of the other e‑Sword apps are also available for use in e‑Sword at no additional cost.
When installing a locked module, you will be prompted to enter your credentials — your email address and product key — to verify your license. If you do not have this information available, select the "Recover Product Key" button on the dialog that prompts for it.
General Use Tips
Mouse Gestures
Scrolling the mouse wheel will move the content of the view up or down.
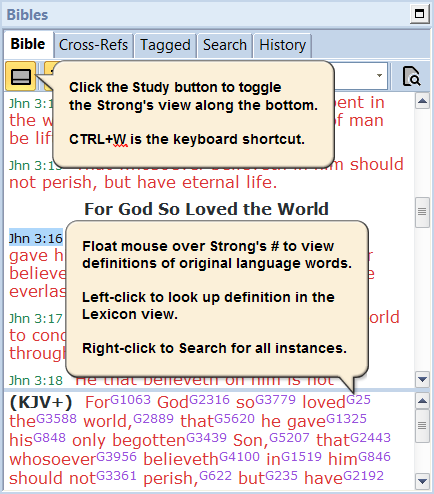
Clicking anywhere on a Bible verse makes that verse the active verse. By default, this action synchronizes the Commentary view with the selected verse. In addition, whichever word you click on will be looked up in the Dictionary view, or, if you click on a Strong's number, it will be looked up in the Lexicon view. Because of this, where exactly you click matters.
Right-clicking brings up a context-specific popup menu. The items available in this menu will change depending on the current selection, or lack thereof.
The right-click gesture in the Bible view will display a popup menu with these view-specific features:
Bookmark — instantly bookmark the verse.
Copy Verses — copy 1 or more verses in a variety of formats.
Highlight — highlight 1 or more verses in a variety of colors.
Study Note — add/edit a study note on the verse.
Tag — tag the verse with 1 or more categories.
Hovering the mouse pointer over a Scripture reference link will display a popup tooltip showing that passage. Likewise, hovering over a Strong's number will display a popup tooltip with its definition. Throughout the resources, you will encounter Scripture reference links — click on any of these to move directly to that Bible reference.
Menus
Bible
Copy Verses will display a dialog with a variety of formatting options for you to copy Bible verses onto the Pasteboard for pasting elsewhere.
Highlighted Verses will display a dialog with a listing of highlight colors. Select an item from the list to see all Bible verses you have highlighted with that color.
Tagged Verses will display a dialog with a listing of all Categories you have tagged Bible verses with. Select an item from the list to see all Bible verses you have tagged with that category. Right-click and choose Reset to empty the category of its verses. Click on the Tagged tab in the Bible view to work with the tagged verses.
Bible Compare will display a dialog to select which Bible translations are listed in the Compare display mode.
Delete History will delete the listing of all Bible verses you have visited.
Options
Display Settings will display a dialog with options for all of the view settings. These are globally appplied.
Font Settings will display a dialog with options for all of the font settings. These are globally appplied.
Resource Settings will display a dialog with all of the resource modules that have been installed. Uncheck any items you do not wish to be displayed in the app. This is also where you can redirect e‑Sword as to where it should look for the Resources and User Files.
Custom Categories will display a dialog to add/edit/delete your own categories for tagging Bible verses with.
Highlight Labels will display a dialog to edit the labels displayed on the Highlight colors.
Help
Keyboard Shortcuts will display a dialog with a handy list of hoykeys to common functions and features.
Technical Support will open up your Internet browser and take you to the Contact web page where you can submit any feedback as needed.
Reset Preferences will restart the app using the app's initial default settings. All installed resource modules and user files will remain in place.
Navigating the Bible
Go to a Bible Verse
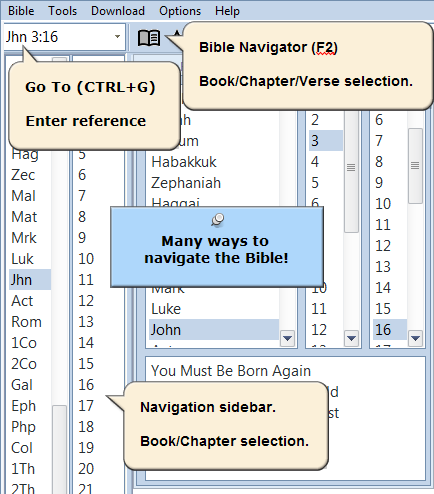
Basic navigation is accomplished by clicking the Bible Navigator button ( ). Select the Book, then the Chapter, then the Verse. You may also use the Navigation sidebar on the left side of the screen, or the Go To field directly above the sidebar, where you can simply type in the passage you wish to visit.
To go to an encouraging, random verse, select the Awesome button ( ).
).
After navigating to a Bible verse, you will notice that its reference background is highlighted with a pale blue coloring. This highlighting denotes that verse as the active Bible verse and synchronizes the Commentary view with it.
To make a different verse the active verse within the current chapter, simply click on that verse.
Searching for a Word or Phrase
To search for a word or phrase, click on the Search tab. Enter the search word or words into the Search Words field, then refine how the search is performed by adjusting the various search settings. All Words is typically the best search type to try first.
You can also search for a word or phrase by selecting that text, right-clicking over the selection, and choosing Search from the popup menu.
Refine how the search is performed by adjusting the search settings as described below:
Search Type
All Words will perform a Boolean "AND" search, thus all of the words entered into the Search field will need to be found for a result to be returned.
Any Words will perform a Boolean "OR" search, thus any of the words entered into the Search field can be found for a result to be returned.
Phrase will perform an exact phrase search on the words entered into the Search field.
Case-sensitive ( )
)
Turn this option ON to match the exact spelling of the search terms. For example, a search for LORD would only return results for "LORD", and ignore "Lord" and "lord".
Partial Match ( )
)
Turn this option ON to match words that contain even a part of each word specified in the search terms. For example, a search for love would return results for "love" as well as "loved", "loves", "lovely", "beloved", etc.